> ## Documentation Index
> Fetch the complete documentation index at: https://docs.lettherebe.app/llms.txt
> Use this file to discover all available pages before exploring further.
# Create
> Generate up to nine candidate images per beat in LTB Image Mode, then promote your keepers into the shot gallery to animate them as video.
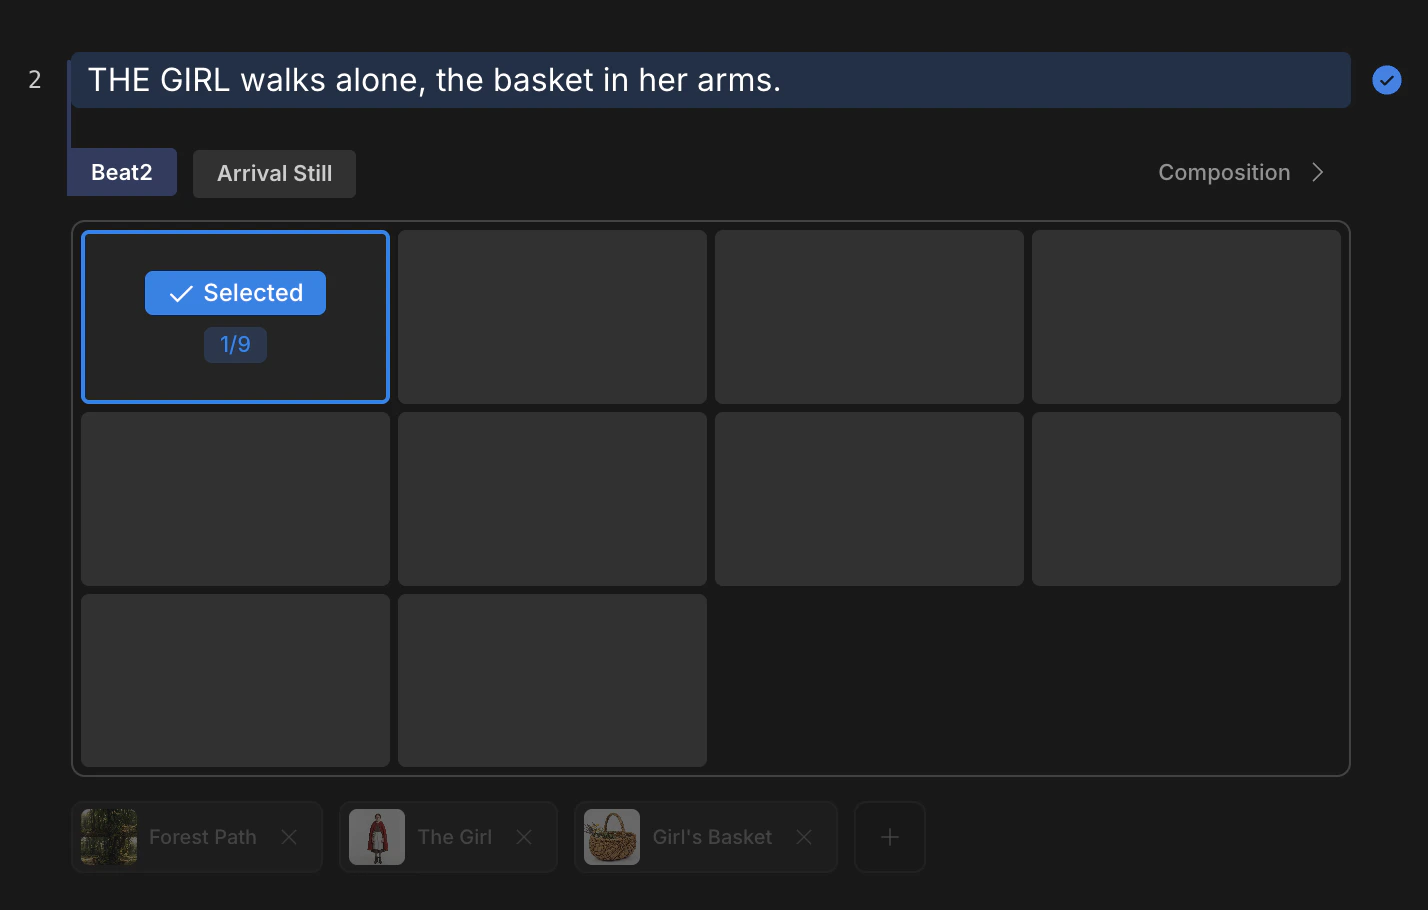
Create is the bridge between Scenario and Video. Each beat opens a generation panel; one click produces up to nine candidate frames. Promote the keepers and archive the rest. Promoted shots become the first frames for Video.
 ## The pipeline position
Create sits between Scenario and Video. The beats you wrote upstream are the input; the shots you promote here are the input to Video.
```
Scenario → Beat → Candidates (Create) → Shot → Video
```
Each promoted shot lands in the shot gallery as a first frame. A weak first frame yields a weak video — Create is where the still gets it right.
## Generate up to nine in one batch
The panel runs at three grid sizes. Pick the size that matches the comparison you need.
| Grid | Candidates per run |
| ----- | ------------------ |
| `1x1` | One frame |
| `2x2` | Four frames |
| `3x3` | Nine frames |
`3x3` is the working default for early exploration. Drop to `2x2` once the look stabilizes, then `1x1` for final retries.
## Assets travel with the beat
Generation pulls in everything the beat already references. You do not re-state these in the prompt.
* The Set assigned to the scene the beat belongs to
* Every Character or Subject mentioned via `@` on the beat's line
The prompt field is for the moment-specific direction — action, lighting, mood. The cast and location come for free.
The auto-included assets only attach when they were registered via `@` in Scenario. Plain `@name` text without a selection from the autocomplete is treated as a regular word and does not bind. Verify each name shows up as a chip on the line before generating.
## Panel options
The bottom panel exposes the levers that shape the candidate frames. Generation cost is shown next to the run button — it updates as you change options.
## The pipeline position
Create sits between Scenario and Video. The beats you wrote upstream are the input; the shots you promote here are the input to Video.
```
Scenario → Beat → Candidates (Create) → Shot → Video
```
Each promoted shot lands in the shot gallery as a first frame. A weak first frame yields a weak video — Create is where the still gets it right.
## Generate up to nine in one batch
The panel runs at three grid sizes. Pick the size that matches the comparison you need.
| Grid | Candidates per run |
| ----- | ------------------ |
| `1x1` | One frame |
| `2x2` | Four frames |
| `3x3` | Nine frames |
`3x3` is the working default for early exploration. Drop to `2x2` once the look stabilizes, then `1x1` for final retries.
## Assets travel with the beat
Generation pulls in everything the beat already references. You do not re-state these in the prompt.
* The Set assigned to the scene the beat belongs to
* Every Character or Subject mentioned via `@` on the beat's line
The prompt field is for the moment-specific direction — action, lighting, mood. The cast and location come for free.
The auto-included assets only attach when they were registered via `@` in Scenario. Plain `@name` text without a selection from the autocomplete is treated as a regular word and does not bind. Verify each name shows up as a chip on the line before generating.
## Panel options
The bottom panel exposes the levers that shape the candidate frames. Generation cost is shown next to the run button — it updates as you change options.
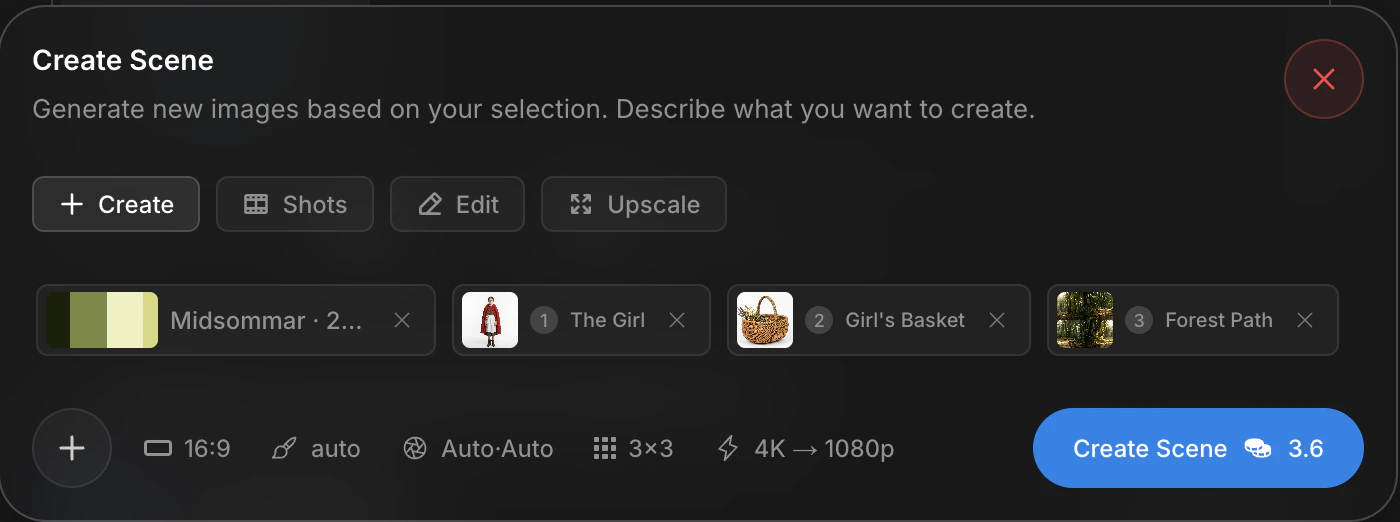 | Option | Values |
| ------------ | --------------------------------------------------------- |
| Grid | `1x1` · `2x2` · `3x3` |
| Aspect ratio | `16:9` · `9:16` · `1:1` · `21:9` |
| Resolution | `0.5K` · `1K` · `2K` · `4K` (model-dependent) |
| Camera spec | Camera body · lens · focal length · aperture |
| Visual style | Cinematic, Pixar 3D, anime cel, scifi realism, and others |
| Model | `Pro` (Nano Banana Pro) · `Flash` |
Model and resolution drive token cost the most. See [Image models](/models/image) for the full pricing table.
## Beat gallery
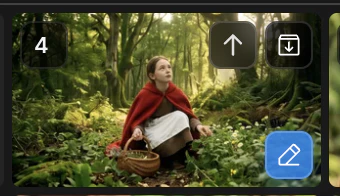
Generated candidates land in the beat gallery — the panel above the prompt area, scoped to the active beat. Each tile carries two action buttons at the top right.
| Button | Action |
| ---------------- | ------------------------------------------------------------- |
| `↑` (up arrow) | Promote to the shot gallery — selects the frame for animation |
| `↓` (down arrow) | Archive — hides the frame from the active view |
## Promote a shot
A promoted frame moves into the shot gallery, the input feed for Video. Each beat can promote as many shots as needed; three promoted shots from one beat produce three different cuts.
```
Beat gallery (candidates)
├─ ↑ promote → Shot gallery → first frame for Video
└─ ↓ archive
```
Promote more than one shot when a beat carries more than one angle. The same beat can hand off a wide and a close-up; Video animates each promoted frame independently and Timeline assembles them later.
## Refine before animating
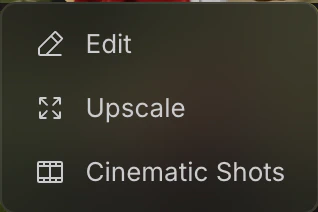
Three edit modes branch from a candidate. Hover a tile and click the pencil icon at the bottom right of the tile to open the menu, or pick a mode from the panel header.
| Mode | Purpose |
| -------------------------------------- | ---------------------------------------------------------------------------------------- |
| [`Edit`](/image-mode/edit) | Re-render a region of the frame, or paste in elements from another shot |
| [`Upscale`](/image-mode/upscale) | Raise the resolution of the same frame |
| [`Shots`](/image-mode/cinematic-shots) | Re-render the same beat as nine cinematic variations — different angles and compositions |
Either entry point opens the same panel. Use the pencil menu when you start from one tile; use the panel header when you want to switch modes without selecting a new tile.
Refine the first frame before animating. Video generation costs `15` to `40` tokens per clip; re-running Create on a weaker frame costs `1` to `6` tokens. The cheaper iteration is always on the still.
## Next
Re-render the same beat in nine cinematic variations.
Repaint a region or merge elements from another shot.
| Option | Values |
| ------------ | --------------------------------------------------------- |
| Grid | `1x1` · `2x2` · `3x3` |
| Aspect ratio | `16:9` · `9:16` · `1:1` · `21:9` |
| Resolution | `0.5K` · `1K` · `2K` · `4K` (model-dependent) |
| Camera spec | Camera body · lens · focal length · aperture |
| Visual style | Cinematic, Pixar 3D, anime cel, scifi realism, and others |
| Model | `Pro` (Nano Banana Pro) · `Flash` |
Model and resolution drive token cost the most. See [Image models](/models/image) for the full pricing table.
## Beat gallery
Generated candidates land in the beat gallery — the panel above the prompt area, scoped to the active beat. Each tile carries two action buttons at the top right.
| Button | Action |
| ---------------- | ------------------------------------------------------------- |
| `↑` (up arrow) | Promote to the shot gallery — selects the frame for animation |
| `↓` (down arrow) | Archive — hides the frame from the active view |
## Promote a shot
A promoted frame moves into the shot gallery, the input feed for Video. Each beat can promote as many shots as needed; three promoted shots from one beat produce three different cuts.
```
Beat gallery (candidates)
├─ ↑ promote → Shot gallery → first frame for Video
└─ ↓ archive
```
Promote more than one shot when a beat carries more than one angle. The same beat can hand off a wide and a close-up; Video animates each promoted frame independently and Timeline assembles them later.
## Refine before animating
Three edit modes branch from a candidate. Hover a tile and click the pencil icon at the bottom right of the tile to open the menu, or pick a mode from the panel header.
| Mode | Purpose |
| -------------------------------------- | ---------------------------------------------------------------------------------------- |
| [`Edit`](/image-mode/edit) | Re-render a region of the frame, or paste in elements from another shot |
| [`Upscale`](/image-mode/upscale) | Raise the resolution of the same frame |
| [`Shots`](/image-mode/cinematic-shots) | Re-render the same beat as nine cinematic variations — different angles and compositions |
Either entry point opens the same panel. Use the pencil menu when you start from one tile; use the panel header when you want to switch modes without selecting a new tile.
Refine the first frame before animating. Video generation costs `15` to `40` tokens per clip; re-running Create on a weaker frame costs `1` to `6` tokens. The cheaper iteration is always on the still.
## Next
Re-render the same beat in nine cinematic variations.
Repaint a region or merge elements from another shot.